Big rock candy science
Every sugar crystal needs to grow from a ‘seed’

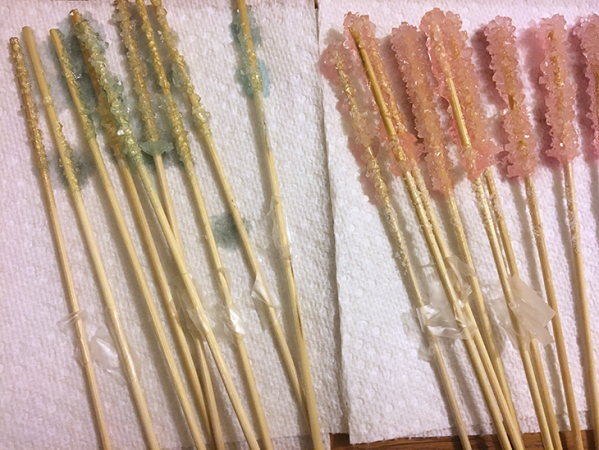
Does dipping sticks in sugar make a difference when make rock candy? Here’s an experiment to help you find out.
jenifoto/iStockphoto
This article is one of a series of Experiments meant to teach students about how science is done, from generating a hypothesis to designing an experiment to analyzing the results with statistics. You can repeat the steps here and compare your results — or use this as inspiration to design your own experiment.
Making rock candy at home is a tasty way to show chemistry in action. But the instructions contain a step that seems a bit odd. You’re supposed to dip your candy stick or string in sugar at the start of the process. Doesn’t that seem like cheating somehow? And is it really necessary? I did an experiment to find out. It turns out that that sugar dip is definitely required. If you want any rock candy to eat, anyway.
It’s easy to make rock candy. All you need is a lot of sugar, some water and a little patience. Pour three cups of sugar into one cup of water, and bring your mix to a boil while you stir. Once the mix boils, the sugar will dissolve into the water. It quickly forms a clear solution. Pour the syrupy mixture into a glass. Hang a stick or string in the mix. Then walk away.
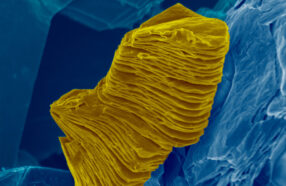
After a few days or a week, sugar crystals will have built up on the string, making a sticky-sweet candy. But the candy doesn’t look like the sugar you started with. The sugar molecules have instead become highly organized into a crystal structure.
A key step in this process is wetting the string or stick and then dipping it in sugar. The sugar clinging to the string or stick serves as a seed crystal. This is a crystal that promotes the growth of the bigger crystals of the rock candy.
Sugar molecules crystallize in a solution when they bump into each other and stick together. This first phase is called nucleation. Once a tiny crystal forms, it serves as a nucleation point. Other sugar molecules then glom on to it and make the crystal bigger. Seed crystals in the rock candy mix serve as this nucleation point, making the rock candy form faster.
How important are those seed crystals, though? To find out, I ran an experiment.
Seedy science
Every experiment starts with a hypothesis — a statement that can be tested. In this case, I’m testing whether seed crystals promote more rock candy formation. My hypothesis will be that using sticks with seed crystals will produce more rock candy than sticks without.
To test this hypothesis, I made two batches of rock candy. One batch, colored blue, will have no crystal seeding. I just put a clean stick into my sugar solution. This batch was my control — where nothing changes. The other batch, colored red, had sticks dipped in sugar before I put them in the sugar solution. To be able to measure if the seed crystals make a difference, I weighed the sticks (and the sugar on them) at the beginning and end of the experiment.
I wanted to make sure I had enough candy to be able to detect a difference in my samples. To do this, I would need to make 26 rock candy cups for each condition, for a total of 52 cups. That’s a lot. Unfortunately, I didn’t have enough sugar. I ended up with nine cups in each group.
Here’s how to make this rock candy:
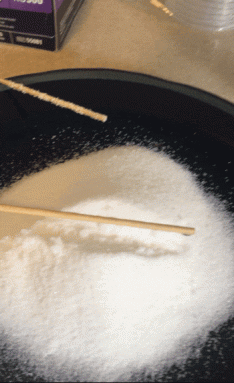
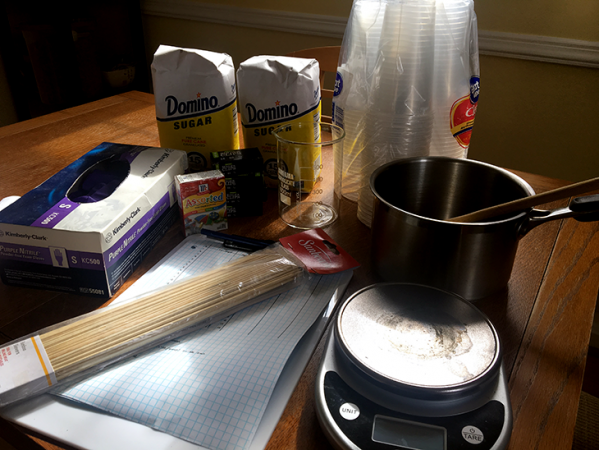
- Take 18 clean pieces of string or wooden skewers, like the ones used to grill kebabs. Set half aside. For the other half, dip the last 12.7 centimeters (5 inches) of the end of the skewer or string into a cup of clean water, then roll it in a small pile of sugar. Set each aside to dry. (If you want to eat your experimental results, make sure you use the blunt ends of the skewers, so you don’t end up poking yourself in the mouth.)
- Set out 18 clear plastic or glass cups.
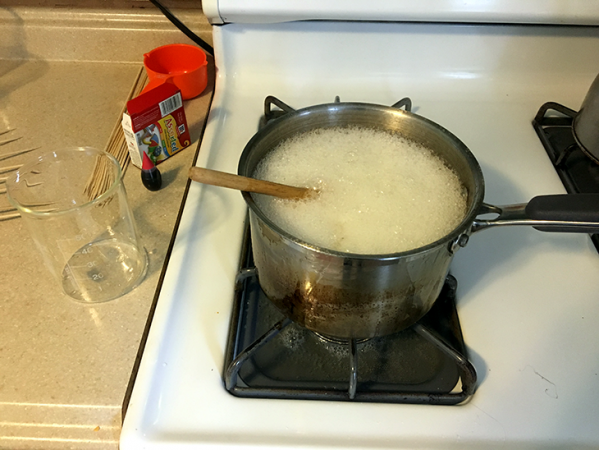
- Meanwhile, bring 4 cups (946 grams) of water and 12 cups (2.4 kilograms) of sugar to a boil in a pot, stirring. Keep an eye on your mix. I walked out on mine, and my sugary solution boiled over and soaked my floor in a sticky mess. Lesson learned.
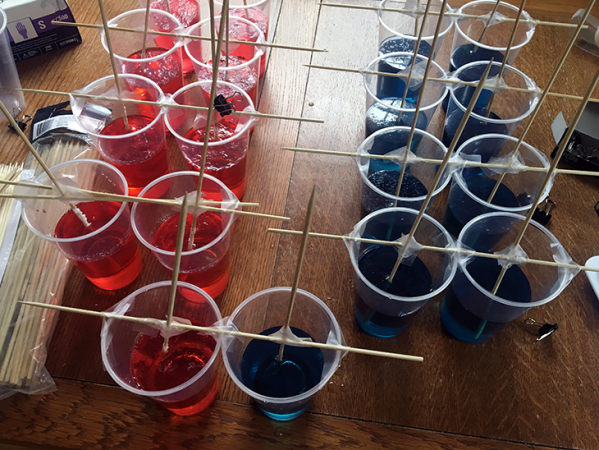
- Once the solution is clear, add food coloring to get the desired color. I used blue for my control, and red for my seed crystal-covered skewers.
- Using a measuring cup, pour 250 milliliters (8.4 fluid ounces) of the solution into each cup. You should have enough for about nine cups of blue.
- Use a scale to find the mass of each stick in grams (each of mine weighed about two grams). Once you have noted the mass, dip the stick carefully into a cup of the sugar solution, and secure it in place. Make sure the stick does not touch the bottom or sides of the cup. I taped my grill skewer to another skewer placed across each cup. But you can also use pieces of string that are tied to a skewer and dangle down into the solution.
- Make another batch of your solution, this time coloring it red, and using your seeded skewers. Make sure to weigh each skewer before you dip it in the solution.
- Put all your cups in a cool dry place where they will not be disturbed.
- Wait.
After a day or so, you might be able to see crystals beginning to grow. The longer you leave the experiment, the bigger your crystals will get, but three days is enough to detect a difference.
After three or more days, get out your scale again. Carefully crack the sugary film on top of each cup with a spoon (this part is very satisfying). Remove the stick or string in the cup, make sure it’s not dripping, and weigh it.
Sweet, sweet results
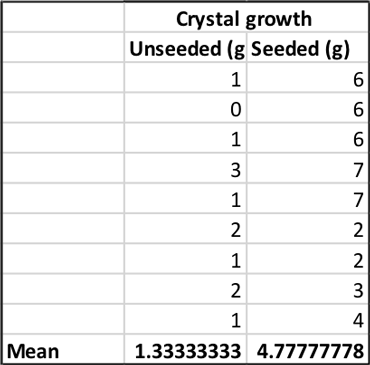
To find out how much rock candy I got in each group, I subtracted the weight of the stick at the beginning of the experiment from the weight of the stick and candy at the end. This gave me a measure of crystal growth in grams. I made a spreadsheet with the average mass of crystals from both conditions. At the bottom of each column, I calculated the mean — the average crystal mass — for each group.
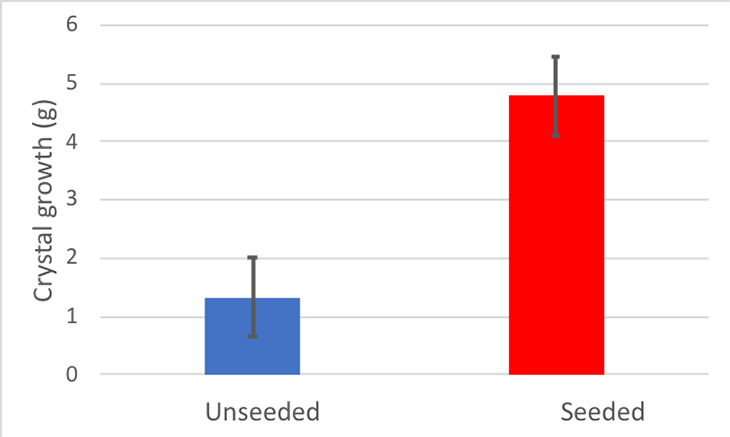
My unseeded sticks grew 1.3 grams of rock candy on average. It didn’t look like a very tasty treat.
My seeded sticks, however, grew about 4.8 grams of rock candy on average. It wasn’t a lot, but it definitely looked like dessert.
But were these two groups truly different? To find out, I needed to run some statistics — tests to interpret the meaning of my results. I used a t test. This is a test that finds differences between two groups. There are free programs that will let you put in your data and run these tests. I used one from Graphpad Prism.
A t test will give you a p value. This is a probability measure. In this case, it’s a measure of how likely it is that I would find by accident alone a difference as big as the one I found. A p value of less than 0.05 (or five percent) is considered by many scientists to be statistically significant. My p value was 0.00003. That’s a 0.003 percent chance that this difference happened by chance. That seemed pretty good.
But I also wanted to find out how big the difference was. I used a measure called Cohen’s d. For this, I needed a standard deviation — a measure of how much my data spread out around the mean (a previous post has more detail). I used another free online calculator for this calculation.
My Cohen’s d for this experiment was 2.19. Generally, scientists count any Cohen’s d above 0.8 as a large difference. So my difference was pretty large. I made a graph of my results.
Based on the results of my experiment, it’s clear that those tiny seed crystals are an important rock candy hack. My hypothesis was that using sticks with seed crystals will produce more rock candy than sticks without. This experiment supports that hypothesis.
This study had limitations, though — things I could have done better. I had only nine cups per groups, which is definitely not enough. Next time, I need more sugar and more cups. In addition, while I looked at the total mass of the rock candy, I didn’t look at how fast it formed. I would need to weigh my candy every day of the experiment to look at the speed of my candy crystal formations. I clearly need to do more experiments. I guess I’ll just have to make more rock candy.
Materials List
Granulated sugar (3 bags, $6.36 each)
Grill skewers (pack of 100, $4.99)
Clear plastic cups (pack of 100, $6.17)
Large pot (4 quarts, $11.99)
Measuring cups ($7.46)
Scotch tape ($1.99)
Food coloring ($3.66)
Roll of paper towels ($0.98)
Nitrile or latex gloves ($4.24)
Small digital scale ($11.85)
Note: This story has been updated to correct a numerical conversion error in the methods section.
Follow Eureka! Lab on Twitter